Sometimes, Windows shows a blue screen of death (BSOD) when there’s something wrong with memory management. Although it is observed that Windows 10 is a much smooth operating version but that doesn’t clarify that you won’t receive stop code memory management error still.
Although, memory management errors tend to get fixed easily if you use the right solutions for them. So, we compiled all the possible solutions that can fix the stop code memory management error in this article. Let’s have a look at them in detail.
Contents
Possible Reasons For Memory Management Error
 We have listed a few causes that lead to the stop code memory management error, mostly we’ve seen that it could be a hardware failure or maybe software failure at times:
- This error could be due to a fault in your computer’s RAM.
- Corrupted system files are another reason.
- Use of an outdated version of Windows OS.
- There could be a fault in the system disk as well.
- Outdated hardware could be another reason.
How to Fix Stop Code Memory Management Error
We discussed the reasons that could cause memory management error, and now we will see all the possible solutions that can fix this issue. We have listed 7 possible ways that can help you fix the memory management error, here they are:
1. Make Use Of Windows memory diagnostic Tool
If you receive an error related to memory management then, to fix that issue the first thing that you can try is to use Windows Memory Diagnostic Tool, this will check for what is wrong in your PC and fix the issue of stop code memory management, here’s how to run this tool on your Windows PC:
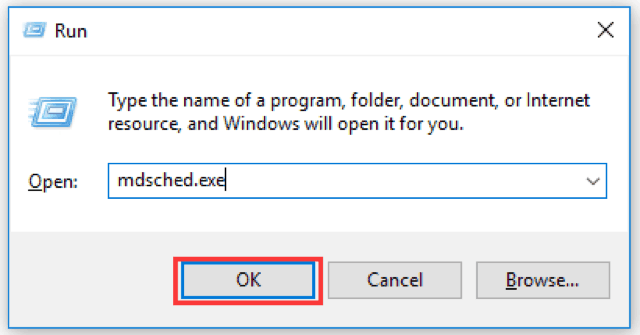
- First of all, press the Windows key and the alphabet “R” key from the keyboard together (Windows+R), this will launch the Run dialog box window on your PC.
- A box will appear on the screen, type “mdsched.exe” in the box as shown in the image below, and press the “OK” button to run this tool.

- Now, the Windows Memory Diagnostic window will open on your screen showing two different options, you have to click the “Restart now and check for problems (recommended)” option. This option will run an immediate check over your RAM to find out the problem or you can also click on another option i.e. “Check for problems the next time I start my computer” to schedule the check for the next time when you restart your computer.
- Now, a new screen will appear rebooting your computer, you will have to wait until Windows Memory Diagnostic Windows shows up the memory problem.
- The process might take longer than expected but the results will be displayed once you log back into your computer again.


2. Scan For Disk Errors
You should look for errors in your drive as it is possible that at times, stop code memory management issue occurs due to the hardware failure. In such a case, one should try to run the Check Disk Utility (chkdsk) to repair the blue screen of death (BSOD). Here’s how you can do this:
- Go to the Cortana Search box (it’s a ring-like icon present in your Taskbar) on your Windows PC. Type “command prompt” in the search box and then as the search results appear right-click on the Command Prompt, and from the menu that appears, click on the “Run as administrator” option.
- Windows PowerShell will open up with a whole code, all you have to do is type “chkdsk/r” and then press Enter.
- Then, you will be asked if you want to run it the next time when you restart your computer. Simply type ‘Y’ after (Y/N).
- Now, you can restart your computer and the program will run automatically to check for the errors and repair them as well.


3. Cleaning Temporary Files/Folders
This is another fix if the above-mentioned solutions don’t work. This might help the stop code memory management error as sometimes, these temporary files and folders tend to slow the computer’s running speed and in turn cause memory errors. Thus, it is preferred that we delete these files by Disk Cleanup Utility (cleanmgr).
- You have to follow the similar first step as you did in the previous solution, press “Window+R” to launch the Run dialog box and then you have to type “cleanmgr” in the box as shown in the image below. Press the “OK” button.
- Now, a screen will appear where you have to choose the system drive that you want to clean up, and then, click on OK after selecting.
- The Disk Cleanup window will appear on the screen showing all the temporary files/folders occupying the disk space of your PC. You can check the files you want to delete (you can use Disk Cleanup to free up to 30.2 MB of space) and then, click on OK.
- Now, the next screen will ask for your confirmation if you are sure to delete all those files permanently. Just click on the ‘Delete Files’ option to confirm the message. It might take a little time to finish.


4. Checking For Corrupted System Files In PC
You should check for corrupted system files in your PC to fix the memory management error. This could be easily done by using the ‘sfc’ command. Here’s how you can run this command:
- Right-click on the Windows icon, it is located on the bottom-left corner of the taskbar, a list of options will appear, click on Windows PowerShell (Admin).
- The PowerShell window will appear on your screen, type sfs/scannow and then, press “Enter”.
- The process will take a little while to end but, if any error is detected during this process, it will automatically be fixed.


5. Update to Latest Windows 10 Build
This error also occurs if you’re using an outdated version of Windows. It is highly recommended that you update your Windows OS to Windows 10 to improve your PC’s performance, stability and to fix all the bugs.
- Click on the Windows icon, it is located on the bottom left corner of the Taskbar. A menu will open on the side now, click on the wheel like icon i.e. Settings.
- The settings window will open up on the screen, lookup for “Update & Security” and click on it.
- A new screen of Windows Update will open up, click on the “Check for updates” button. The server will automatically update to the most recent version of Windows 10. Restart your computer once the update is over and now, check if the stop code memory management is fixed.


6. Resetting Windows 10
It is a very basic principle for when you can’t seem to fix an error in any device, you go to your last resort after trying every possible solution and that is to reset your device. At times, when it becomes impossible to tackle a corrupted file, you should reset or reinstall Windows on your PC to get back at normal. Here’s how you can fix the memory management error:
- Click on the Windows icon, it is located on the bottom left corner of the Taskbar. A menu will slide out on the left side, click on the wheel like icon i.e. Settings.
- Now, the Settings window will appear on the screen, click on “Update & Security” option.
- A new page will open up, look upon the left menu of this page, and select the “Recovery” option.
- Click on the “Get Started” button which is present under Reset this PC.
- A new window will open up of Reset this PC providing 2 options: Keep my files, and Remove everything. We would recommend that you select the Keep my file option to keep your files and data safe but remove all the apps and every setting.
- The next page will provide you with a list of apps to be deleted but you can note down the names of these apps if you want to reinstall them afterward. Click on “Next” after this.
- And now finally, click on the Reset button to run the operation. Your computer will restart once the resetting operation is finished.


7. Replace System Disk
Okay now, this is the very last solution that we can recommend you if you still receive the stop code memory management error after following every solution that we’ve mentioned above. It is highly possible that there is a fault with your system drive.
Using MiniTool Partition Wizard for migrating the system disk and reinstalling the Windows 10 might do the job, here’s how the process goes:
- First of all, get a new hard disk for your PC and connect the disk to your computer. Now, download and install MiniTool Partition Wizard and, after its successful installation, run the program in your PC.
- Click on Migrate OS to SSD/HD Wizard option available on the left side menu.
- Now, you have to select the new system disk as your target disk and then, confirm the option. You will get a notice just read it and select “Apply”

Conclusion
And here we come to the end of this article. This article was a technical based one and we hope you loved reading it. We have provided you with all the possible solution that can fix the memory management error on you Windows PC. I really hope that this article comes out to be useful. Let us know about your doubts and queries in the comments box down below.